While chatting with a friend yesterday, she pointed out that I don’t talk much about travel on my blog. And yet, travel is one of my biggest passions! I used to work in pricing for an airline, and now work in travel/hospitality consulting; most of what I do all day relates to airlines and hotels, so I know a decent bit about the industry. But while I’ve said many times that the travel logistics were one of the toughest parts of my fifty state goal (yes, actually harder than running all those marathons!), outside of trip reports and a few tips here and there (like five tips to beat jetlag), I don’t really share much about the topic. Per Kelly’s request, I’m going to start sharing some of that knowledge with all of you.
Inspired by today’s announcement that Google and ITA are abandoning the airline reservation basis, I thought I’d start with an overview of ITA Matrix. Raise your hand if you’ve heard of it? (Crickets) Yeah, didn’t think so. I consider ITA Matrix to be the most powerful flight search out there, and yet I’m shocked how many people are still using tools like Kayak and Expedia. ITA can be rather daunting, but it is very easy to use once you learn just a few bits of shorthand. (And honestly, they’ve simplified it quite a bit over the years to be much more user-friendly than it once was.)
When you first go to matrix.itasoftware.com, you’ll get a pretty simple blue search box. I’m not going to explain how to fill in “departing from,” “destination,” or “dates,” – because if you can’t figure that much out, you probably don’t have the common sense to handle traveling anyway 🙂 Every flight search engine has those fields; where ITA excels is in customizations. Let’s walk through each of the fields I’ve circled below.
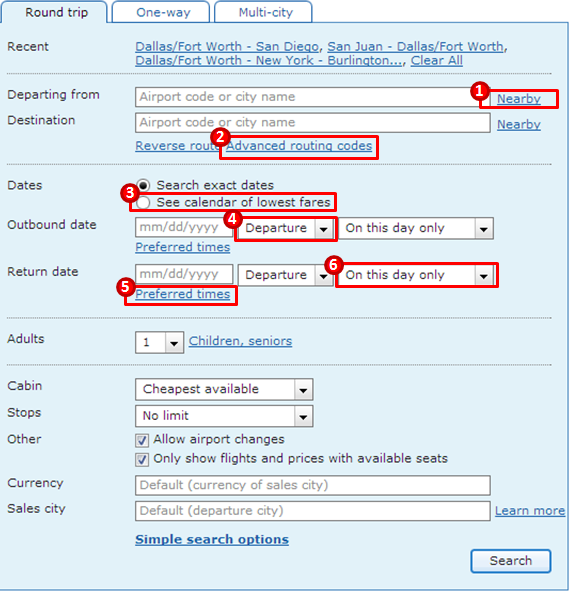
1. Nearby airports allows you to identify alternate airports that might work with your destination. Type the airport/city code into the departing (e.g., NYC or LGA), and then adjust the radius as needed. You’ll discover all kinds of airports you didn’t know existed! Now, many of these will be tiny little airfields without commercial service, but there have been times I’ve discovered really good alternate airports that just didn’t turn up someplace like Kayak. (This works particularly well if you’re willing to drive further than 50 miles, which may sound like a pain but works totally well if the other airport is in a cool place that you’d also like to visit and you can divide your trip.)
2. Advanced routing codes are the bread and butter of ITA, and why I like it better than any other search engine out there. The codes I use most frequently are:
– Two letter code to specify airline (AA, UA, CO, DL, B6, F9 are my most commonly used for the US; check here for a full list). This can be separated with commas if you’re willing to take multiple carriers (e.g., “UA,DL”). If you are willing to take a connection, add a plus symbol to the end of each airline code; if you want nonstops only, just put the airline code. So, I might enter “AA ,DL+” if I’m willing to fly American for nonstops only but I’m willing to take connections if it’s on Delta.
– Three letter airport/city code to specify where I want to connect. Again, you can use commas here if you’d consider multiple connecting cities, or you can put spaces between them if you want to specify multiple stops. I love this for adding overnights in places where I can visit friends or do something cool for a night before getting to my ultimate destination.
You can also combine these; just remember that a comma means “or” and a space means “and.”
For a full list of codes, check out Google’s FAQ.
3. See calendar of lowest fares is great if you know where you want to go but are a bit flexible on dates. If you know you want to take a weekend trip somewhere, your decision might be swayed by the fact that one weekend is $300 less than another. Or if you’re really flexible, you can do a Wednesday to Tuesday week-long vacation to take advantage of the fact that Tuesdays/Wednesdays are generally off-peak days and have more sale fares available. (Remember, though, this Tuesday/Wednesday being cheaper rule is about when to fly, not when to book.)
4. The departure box is a great one to toggle if your travel needs to be completed in time for an event. On the outbound, you might need to be somewhere in time for a wedding or marathon; on the return, you might need to be back on Monday in time for work. If you’re flexible on taking red eyes or other strangely-timed flights, it might be a good idea to toggle this to “arrival” so that you can see all possibilities early that morning instead of cutting off your search the night before. (Note: if you’re going to use this field, you’ll probably need to do multiple searches, since it’s arrival on and not arrival by.)
5. Preferred times is pretty self-explanatory, but I’d like to note that it can be a good idea to experiment with toggling the times right around your preferred times as well. If you ask for a flight in the evening (defined as 5:00-9:00pm), you don’t really want to cut off a technically-afternoon flight of 4:59pm, do you?
6. On this day only is another one that’s great for flexibility. I generally do one day before/after on most of my leisure travel, since I don’t want to cut off an earlier/later departure/arrival. Remember, it’s best to be flexible in the search terms and narrow the possibilities later, when you’re looking at the results.
Speaking of which, when you click the search button at the bottom, the results are exactly what you’ll get! But you’re not done filtering just yet…
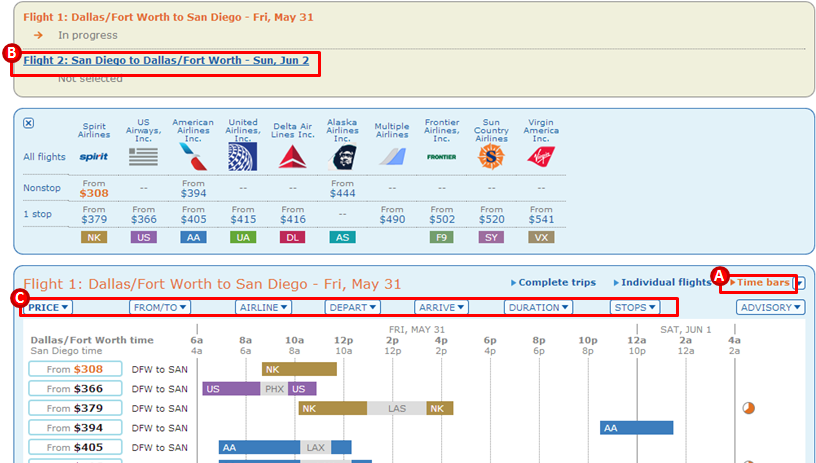
ITA does a smart thing in showing you one leg at a time (if it doesn’t, make sure you’re in “time bar” mode – see A), but displaying the price as the lowest total price you’ll pay if you choose that segment. I like this a lot more than how most airline search websites show you a per-leg price that then skyrockets when the first flights you selected force you to choose a super expensive flight at the end. By clicking on the Flight 1 / Flight 2 links at the top (B), you can choose your departure/return in any order. I find this extremely helpful when there are two carriers that serve a city-pair nonstop but only one of them has a “good” return flight. For example, I’m usually loyal to Delta, and so would choose them if presented with two identical flights on the outbound. But if Delta only departs at 11:59pm on the return while American has a 6:00pm departure, I’d rather take American! Since airline pricing is often done on a roundtrip basis, choosing Delta for the first leg would prevent me from even seeing that convenient American flight on the return – which is why I like to click back and forth lots (and even select and unselect flights) to see all the possibilities.
When it comes to the filters above the matrix display from which ITA Matrix gets its name (C), the possibilities here are pretty endless… and yet easy to understand. Since by default the matrix sorts from lowest to highest price, I usually leave the first filter alone – might as well see what’s out there, even if it’s crazy expensive! I like the “From/To” filter to see just what the prices are from alternate airports, particularly if I’m considering flying to a smaller city vs flying to a big city and then driving. “Depart” and “Arrive” are self-explanatory, but they’re also ones that I tinker with a lot, particularly when there are a lot of options around the same price point (if this is the case, scroll down and choose the “all” view in the bottom right, which gives you a better visual representation of all your choices). “Duration” and “Stops” I use a bit less – when you’re in “time bar” mode, you can see that visually on the matrix anyway.
Once you’ve selected a flight for each leg, you’re brought to the final itinerary screen.
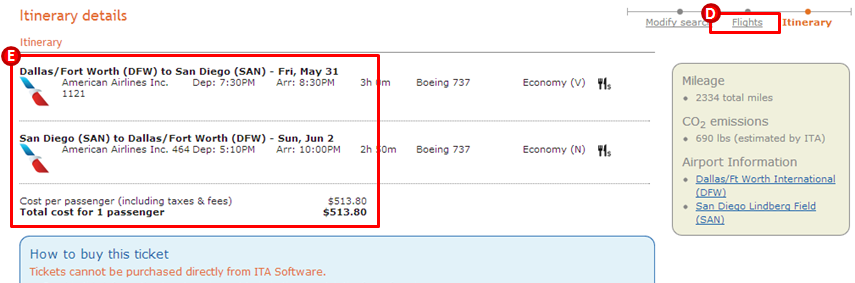
If you’re not happy with your itinerary, choose the “Flights” link to go back and reselect your choices for one or more legs (D). But if you’re all set, what you have to look at is the itinerary that’s generated (E). ITA Matrix is for finding flights only; you can’t book directly from here. Instead, take note of the carriers, dates, times, flight numbers and price. You’ll then need to go search directly on the airline’s website (which is where you’ll get these best prices anyway) in order to book. If there are multiple carriers, now is when it’s appropriate to use Kayak (since it’s tough to book multi-airline flights from their individual websites… but since you’ve already figured out which flight options are best, you can just input those parameters instead of dealing with Kayak’s not-quite-as-robust options.
One final caveat: while ITA Matrix offers a ton of flexibility, its searches time out after 60 seconds. So if you’re trying to be too broad in your search (I’m willing to fly from anywhere on the East Coast to twenty destinations in the Caribbean!), you won’t get all the options. Instead, try searching smaller subsets at a time. It’s a bit more time-consuming, but it honestly pays off in getting great deals. (Like my $150 roundtrip to Copenhagen, my $350 roundtrip to Peru, and my $450 roundtrip to Tokyo!)
Happy travels, and of course please feel free to ask any questions in the comments!
How slick! Looking forward to more travel tips :).
I’ll keep them coming 🙂
This is incredibly helpful! Thanks, Laura! Also, love that you will be adding travel tips. I might be doing a lot of travel over the next few months depending on budget, and any tips you can share would be much appreciated 🙂
Yeah, it was definitely a “duh!” moment when my friend pointed out that I really ought to have travel tips on my blog 🙂 I’m all about traveling on a budget!
I don’t want to be a downer, but I don’t get how this matrix is any more helpful than other aggregate sites.
I am not a frequent traveler (business or pleasure), but the times I do I am able to fine-tune my searches and look for off-peak fares pretty easily (I thought) using various flight/travel matrices. Did I not read the post carefully enough? Am I just a more cognizant flight shopper than the average flyer?
Unrelated, is the ‘G’ fav-icon symbolic of a stronger relationship with the Greatist news magazine? Pretty cool. I love it how you put yourself in the position for new opportunities.
The main benefits of using ITA Matrix are that you can customize ANYTHING since it’s via text instead of GUI filters. You can discover atypical routings that wouldn’t be possible via the regular matrices. I’d say with the regular flight/travel search tools you’ll get about 90% of the options, but ITA allows you to find weird connections (like Boston to Orlando via San Francisco) that other search tools filter out.
I am SO glad you mentioned that G favicon! It’s actually the default Genesis favicon (Genesis is my WordPress theme), and my designer said it was just my computer’s cache showing it instead of the favicon I was supposed to have. However, realizing that you had it made me dive deep into the php files and figure out the error that’s solving the problem – so it should show up as my logo now. But I do love Greatist 😉
So, about the ITA vs other sites, fair enough. The next time I plan a mini-vacation I’ll do some side-by-side searches just for the sake of it. If anything, I do appreciate the no-frills of their UI.
PS In case you care about the old dinosaurs that still use Internet Explorer your domain specific fav-icon does not show in that browser (I may not have the current version for that – I don’t care about IE). It works perfectly in Firefox and Chrome (and if I still had Opera I’d give it a try, but I have a feeling it works in that as well).
Let me know how the results of your experiment turn out! I’d be curious.
Just tried in IE8 and it seems to be okay, so I think I’m just leaving it and not trying to mess with the php any more. But please do keep me posted on anything else you like/don’t like about the new design! There are still lots of little tweaks I want to make (and “About Me”/”FAQ” pages to write/update) so it will keep changing a bit for a while 🙂
This is SUCH a great tool! I literally just saved $50 using it!!!
Glad you like it 🙂
Hey Laura,
When I find fares on the ITA site and then go to the airline site, the fares are not the same, they’re more expensive on the Airline’s site. Is there a way of putting in the codes in to get the fares that ITA shows? (I hope that makes sense.)
Rachel
That’s really strange! ITA shows the price inclusive of taxes/fees, so the only thing I can think of is that you’re adding some sort of extras? Otherwise, it should definitely be as shown. Do you have any example itineraries I can try? (Feel free to email me: laura@50by25.com)